
Betta Fish Care Guide for Beginners: Your Complete First Month Survival Manual
My first betta fish died after nine days.
I’d researched “betta care” online, bought everything the pet store recommended, and felt confident I was doing it right. The employee assured me the plastic half-gallon cube with no heater or filter was “perfect for bettas—they prefer small spaces.” I fed him twice daily because “bettas love to eat.” When the water got cloudy on day five, I dumped it all and refilled with fresh tap water because “clean water is healthy water.”
On day seven, Blaze stopped eating. By day eight, he floated sideways at the surface, struggling to swim. On day nine, I found him dead at the bottom of his tiny plastic prison. I’d killed him through ignorance—despite believing I was following expert advice.
That was eleven years ago. I’ve since successfully kept eighty bettas, including current thriving fish in my home office, living room, and bedroom. I’ve learned the hard way that most “beginner” betta care guides skip the most critical information: what to do during your first week, what your fish’s behavior means, and how to recognize disasters before they become fatal.
This isn’t another equipment checklist. This is the survival manual I desperately needed on day one—the guide that would’ve saved Blaze’s life and countless dollars in panic-buying equipment after things went wrong.
Let me save your first betta from my mistakes. Here’s everything you actually need to know to keep your betta alive and thriving through the critical first thirty days.
Why Most Beginners Fail: The Three Deadly Myths
Before we discuss equipment or setup, you need to understand why roughly 60-70% of first-time betta owners lose their fish within the first month. It’s not because bettas are fragile—they’re actually incredibly hardy. The problem is three persistent myths that contradict betta biology:
Myth 1: “Bettas Live in Puddles, So They Don’t Need Much Space”
The Truth: In the wild, Betta splendens inhabit rice paddies, slow-moving streams, and shallow ponds spanning acres—not puddles. During dry seasons, they may temporarily occupy smaller pools, but they’re actively seeking larger water sources, not thriving in confinement. The “betta in a vase” marketing was invented by pet retailers to sell more fish in less space, not based on biology.
The Science: Small volumes of water (under 3 gallons) undergo extreme parameter swings. When a betta produces ammonia (fish waste), a half-gallon container reaches toxic levels (0.25+ ppm) within 12-24 hours. In 5 gallons, the same waste load dilutes to safe levels (under 0.1 ppm). This isn’t optional preference—it’s basic chemistry.
What killed Blaze: His half-gallon cube accumulated fatal ammonia levels within days. The cloudiness I saw on day five was a bacterial bloom feeding on toxic waste. When I dumped and refilled all at once, I shocked him with rapid parameter changes and removed the tiny colony of beneficial bacteria that had just started developing.
Myth 2: “Bettas Are Tropical, But They Adapt to Room Temperature”
The Truth: Bettas are native to Southeast Asia where water temperatures range 76-82°F year-round. They’re physiologically adapted to warmth. At temperatures below 75°F, their metabolism slows, immune system weakens, and digestion nearly stops.
The Science: Bettas are ectothermic (cold-blooded), meaning their body temperature matches water temperature. A betta in 68°F water (typical room temp) experiences the equivalent of a human with hypothermia—sluggish, unable to digest food, susceptible to disease. Studies show bettas at 72°F have 60% lower immune response than those at 78°F.
Why this matters for beginners: The single most common reason new bettas “stop eating” is cold water. Your betta isn’t sick or picky—it physically cannot digest food when too cold. Adding more food doesn’t help; it just creates more toxic waste. A $15 heater solves this immediately.
Myth 3: “Bettas Don’t Need Filters Because They Breathe Air”
The Truth: Bettas possess a labyrinth organ allowing them to breathe atmospheric air, which is why they survive in low-oxygen environments—but this doesn’t eliminate their need for clean water. The labyrinth organ evolved as an emergency backup, not a replacement for gills.
The Science: Filters provide three critical functions: (1) Mechanical removal of waste particles, (2) Biological colonization of beneficial bacteria that convert toxic ammonia to less harmful compounds, (3) Water circulation that distributes heat and oxygen. Without filtration, you must perform 50-100% water changes every 2-3 days to prevent ammonia poisoning—a stressful, inconsistent process.
The compromise many beginners fail: “I’ll just change water more often instead of buying a filter.” This works theoretically but fails practically. Life gets busy. You forget one change. Two days become four. Your betta suffers. A sponge filter costs $8 and runs continuously without your intervention.
🚨 Reality Check: If you’re reading this guide because you bought a betta in a cup today and it’s already home, don’t panic. Even an imperfect setup is improvable. The worst mistake is giving up. If you have the wrong equipment, we’ll prioritize fixes in Chapter 3’s First Week Guide. Your fish can survive suboptimal conditions temporarily while you correct them—that’s how hardy bettas truly are when you stop the right problems.

Betta Biology 101: Understanding What Your Fish Actually Needs
Before spending money on equipment, understand what your betta requires at a biological level. This isn’t academic—knowing “why” prevents impulse purchases and helps you recognize problems early.
Respiration: The Dual System
Bettas use two respiratory systems:
Gills (primary): Like all fish, bettas extract dissolved oxygen from water through their gills. This is their preferred method in healthy, oxygenated water.
Labyrinth Organ (backup): When water oxygen drops dangerously low, bettas surface to gulp atmospheric air, which passes through a maze-like organ above their gills that absorbs oxygen directly.
Why this matters: Beginners misinterpret frequent surface gulping as “normal betta behavior.” It’s actually a distress signal that water oxygen is insufficient—usually due to high temperatures (hot water holds less oxygen), lack of surface agitation, or overcrowding.
What normal looks like: A betta in properly oxygenated 78°F water should surface to breathe once every 20-30 minutes. If yours surfaces every few minutes, something’s wrong with your water quality.
Metabolism: Temperature-Dependent Functions
As ectotherms, bettas’ body processes speed up or slow down based on water temperature:
78-80°F (optimal): Active swimming, enthusiastic eating, normal digestion (4-6 hours), healthy immune response, vibrant coloration
74-77°F (suboptimal): Reduced activity, slower digestion (8-12 hours), increased disease susceptibility, duller colors
Below 74°F (dangerous): Lethargic, refuses food, digestion nearly stops, severe immune suppression, prone to fin rot and fungal infections
Above 82°F (stressful): Hyperactive, increased oxygen demand, faster metabolism requires more frequent feeding, shorter lifespan
Why beginners struggle with temperature: Without a thermometer, you’re guessing. “Room temperature” varies wildly—68°F near a window in winter, 85°F in a sun-exposed room in summer. Your betta can’t adapt to 15-degree daily swings. A heater with thermostat maintains stable temperature automatically.
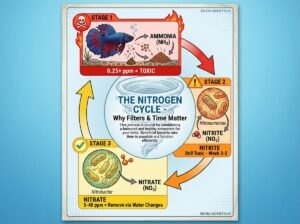
Waste Production: The Nitrogen Cycle
This is where most beginners fail. Understanding the nitrogen cycle is the difference between fish that survive and fish that thrive.
How bettas create waste:
- Bettas eat food → digest it → excrete ammonia (NH3) through gills and waste
- Uneaten food decays → produces ammonia
- Dead plant matter decomposes → produces ammonia
Why ammonia is deadly:
- 0.25 ppm: Burns gill tissue, causes stress
- 0.5 ppm: Severe tissue damage, labored breathing, immune suppression
- 1.0+ ppm: Often fatal within 24-48 hours
How nature solves this:
- Nitrosomonas bacteria (colonizes after 1-2 weeks) converts ammonia → nitrite (NO2, still toxic)
- Nitrobacter bacteria (colonizes after 2-4 weeks) converts nitrite → nitrate (NO3, much less toxic)
- Water changes (your job) remove accumulated nitrates
Why “cycling” matters: New tanks have zero beneficial bacteria. For the first 3-4 weeks, ammonia and nitrite spike dangerously before bacteria populations stabilize. This is called “New Tank Syndrome”—the number one killer of beginner bettas.
The beginner’s dilemma: “Should I wait 4 weeks before adding my betta?” Ideally, yes (fishless cycling). Realistically, most people buy the fish and tank simultaneously. That’s okay—but it requires daily water testing and frequent small water changes for the first month. We’ll cover the exact protocol in Chapter 4.
💡 Quick Science Recap: Your betta needs: (1) Warm water (78-80°F) to function properly, (2) Clean water (ammonia/nitrite near zero) to avoid poisoning, (3) Oxygenated water (surface agitation + breathing access) to breathe. Everything else—plants, decorations, lighting—is secondary. Get these three right and your betta will survive. Get them wrong and no amount of expensive equipment will save it.
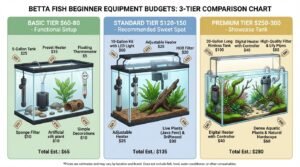
Pre-Purchase Equipment Guide: Three Budget Tiers
Most beginners either overspend on unnecessary items or under-invest in critical equipment. Here are three budget tiers that work, with real prices and specific recommendations.
Understanding the Real Costs
Pet stores sell “betta starter kits” for $20-30 that include a 1-gallon plastic cube, no heater, and decorative gravel. These kits guarantee failure. The minimum functional setup costs more upfront but saves money by not killing fish and requiring emergency replacements.
| Budget Tier | Total Cost | Best For | Compromises |
|---|---|---|---|
| Basic ($60-80) | $60-80 first month $10/month ongoing |
Tight budget, first-time fish keeper, testing if bettas are right for you | More maintenance work, basic aesthetics, limited expansion |
| Standard ($120-150) | $120-150 first month $8/month ongoing |
Committed beginner, wants low-maintenance setup, room for future tankmates | None—this is the “sweet spot” most experienced keepers recommend |
| Premium ($250-300) | $250-300 first month $12/month ongoing |
Wants showcase tank, planning community setup, maximum fish happiness | Higher initial investment, requires more space |
Basic Tier ($60-80): Functional Minimalism
What you get: A 5-gallon tank with heater, sponge filter, and essential maintenance tools. This setup keeps bettas alive and healthy but requires weekly maintenance.
| Item | Specific Recommendation | Cost | Why This Item |
|---|---|---|---|
| Tank | Aqueon 5-gallon standard (bare tank) | $20 | Plain glass, reliable brand, upgradable |
| Heater | Aqueon 50W preset (78°F) | $15 | Affordable, reliable for 5-10 gal |
| Filter | Sponge filter + USB air pump | $12 | Gentle current, easy to maintain |
| Thermometer | Glass floating thermometer | $3 | Accurate, no batteries |
| Test Kit | API Freshwater Master Test Kit | $25 | 800+ tests, liquid (accurate), lasts 2+ years |
| Substrate | Pool filter sand (5 lb) | $5 | Cheap, inert, safe for bettas |
| Decor | 1 silk plant + 1 small hide | $8 | No sharp edges, basic enrichment |
What’s missing: No light (relies on ambient room light), minimal decor, requires manual feeding
Maintenance: 30% water change weekly, test water 2x/week first month
Upgrade path: Add LED light ($15), more plants, upgrade to 10-gallon later
Standard Tier ($120-150): The Sweet Spot
What you get: A 10-gallon tank with all essentials, adjustable heater, hang-on-back filter, LED lighting, and live plants. This is what experienced keepers recommend—enough space for error, low maintenance, room for future expansion.
| Item | Specific Recommendation | Cost | Why This Item |
|---|---|---|---|
| Tank | Aqueon 10-gallon kit (includes filter + LED) | $45 | Complete kit, reliable brand |
| Heater | Eheim Jager 75W (adjustable) | $30 | Precise temp control, durable |
| Test Kit | API Freshwater Master Test Kit | $25 | Same as Basic—don’t skimp here |
| Substrate | Fluval Plant Stratum (4 lb) | $15 | Supports live plants, pH buffering |
| Plants (live) | Java fern + Anubias nana | $12 | Low-light, beginner-proof |
| Decor | Driftwood piece + 2 hides | $18 | Natural look, multiple territories |
What’s included: Everything needed for successful long-term keeping, room for tankmates later
Maintenance: 25% water change weekly, test water weekly after first month
Upgrade path: Add more plants, consider tankmates (snails, shrimp), better light for plant growth
Premium Tier ($250-300): Showcase Tank
What you get: A heavily planted 20-gallon long tank with high-end filtration, quality lighting, and natural aquascaping. This is a display piece—maximum fish happiness and visual appeal.
| Item | Specific Recommendation | Cost | Why This Item |
|---|---|---|---|
| Tank | Aqueon 20-gallon long (30″ × 12″ × 12″) | $45 | Horizontal swimming space, standard size |
| Filter | AquaClear 30 HOB filter | $40 | Adjustable flow, excellent bio media |
| Heater | Fluval E 100W (digital) | $50 | LCD display, precise control, alert system |
| Light | Fluval Aquasky LED (24-34″) | $70 | Programmable, plant growth spectrum |
| Test Kit | API Freshwater Master Test Kit | $25 | Still the best—don’t pay more for digital |
| Substrate | ADA Aqua Soil (9 lb) | $35 | Premium plant growth, natural pH |
| Plants | Variety pack (10+ species) | $40 | Heavy planting, jungle aesthetic |
| Hardscape | Dragon stone + Manzanita wood | $35 | Natural aquascape, multiple hiding spots |
What’s included: Museum-quality setup, room for community (corydoras, shrimp, snails), minimal maintenance
Maintenance: 20% water change weekly, test monthly after cycling
Upgrade path: CO2 injection for advanced plant growth, automatic feeders, additional tankmates
⚠️ Equipment You DON’T Need (Yet): Skip these until you’re experienced: UV sterilizers, protein skimmers (saltwater equipment), automatic feeders (until you master manual feeding), pH buffers (unnecessary with proper substrate), “betta hammocks” (gimmicks), “betta mirrors” (cause stress), ornate decorations with sharp edges (fin damage risk). Save $50-100 by avoiding these commonly-pushed products.
The Critical First Week: Day-by-Day Survival Guide
This is where most beginners fail. Pet stores say “just add your fish and you’re done!” They’re wrong. The first week requires daily monitoring and small interventions to prevent disasters. Here’s exactly what to do each day.
🚨 Emergency Situation? If you bought a betta and brought it home TODAY without proper setup: (1) Float the cup in a container of room-temperature water for 15 minutes to stabilize temperature, (2) Add dechlorinated water to a clean bowl or jar (minimum 0.5 gallon), (3) Gently net transfer the betta (don’t add pet store water—it’s often contaminated), (4) Keep container at 75-78°F using a lamp or heating pad on low, (5) Don’t feed for 24 hours (stress suppresses appetite), (6) Follow Day 2 protocol below ASAP. Your fish can survive 48 hours in emergency housing if you prioritize temperature and clean water.
Day 0: Setup Before Fish Arrives
If you can prepare ahead (ideal scenario):
- Rinse tank with plain water (no soap)
- Rinse substrate thoroughly until water runs clear
- Add substrate, hardscape, decorations
- Fill tank with dechlorinated tap water (use Seachem Prime or API Stress Coat)
- Install and run heater—set to 78°F
- Install and run filter
- Let tank run for 24-48 hours to stabilize temperature
- Test water: Ammonia should be 0 ppm, pH 6.5-7.5 (your tap water baseline)
Why this matters: Tap water contains chlorine/chloramine (kills fish) and dissolved gases that need to off-gas. Running equipment for 24 hours ensures heater works correctly and filter operates smoothly before adding your vulnerable fish.
Day 1: Bringing Your Betta Home
Acclimation protocol (critical to prevent shock):
- Float the bag/cup in your tank for 15-20 minutes. This equalizes temperature slowly. Rapid temperature changes (5+ degrees in seconds) can cause shock or death.
- Open the container and add 1/4 cup of your tank water to the betta’s bag/cup
- Wait 5 minutes. Repeat adding 1/4 cup of tank water every 5 minutes for 20 minutes total.
- Net transfer your betta into the tank. DO NOT pour bag/cup water into your tank—it often contains disease, parasites, and contaminated water from the pet store.
- Turn off lights for 2-3 hours. Let your betta explore in dim conditions (less stressful).
- Don’t feed for first 24 hours. Bettas don’t eat during stress, and uneaten food will pollute your brand-new water.
What to observe:
- Green flag: Fish explores tank within 30 minutes, swims to all areas, investigates decorations
- Yellow flag: Hides for 2-4 hours (normal stress response), stays at bottom but fins aren’t clamped
- Red flag: Lies on bottom with clamped fins, labored breathing (rapid gill movement), floating sideways
If you see red flags: Check water temperature immediately (should be 76-80°F). If below 75°F, fish is cold-shocked—gradually raise temp 2 degrees per hour until 78°F. Check ammonia (should be 0 ppm). If above 0.25 ppm, do 50% water change with temperature-matched, dechlorinated water.
Day 2: First Feeding and Behavior Assessment
Morning routine:
- Check water temperature (should be steady 78-80°F)
- Test ammonia (should still be 0 ppm)
- Observe fish behavior for 5 minutes before feeding
First feeding protocol:
- Offer 2-3 high-quality betta pellets (Hikari Betta Bio-Gold or similar)
- Drop them one at a time at the surface
- Watch if your betta eats them within 2 minutes
- Remove any uneaten food after 3 minutes using a net
What eating behavior tells you:
- Immediately eats, searches for more: Healthy, well-adjusted fish. Feed 3-4 pellets once daily.
- Investigates but doesn’t eat: Still stressed from move. Try again tonight with 2 pellets. If still refuses, check water temperature.
- Ignores food completely: Likely too cold (under 75°F) or severely stressed. Don’t feed again until you see active swimming and interest in surroundings.
Evening check (6-8 hours after morning):
- Verify heater maintaining 78°F
- Test ammonia again (should still be 0 ppm—you haven’t produced waste yet)
- If fish didn’t eat in morning, offer 2 pellets again
Day 3-4: Establishing Routine and Watching for Ammonia
Daily protocol:
- Feed once daily: 3-4 pellets, remove uneaten food after 3 minutes
- Test ammonia (likely still 0 ppm, but cycle is starting)
- Observe behavior: swimming patterns, breathing rate, color
What you’re watching for:
- Ammonia spike: In uncycled tanks, ammonia typically rises to detectable levels (0.25-0.5 ppm) by day 3-5. This is NORMAL but requires action.
- Behavior changes: Clamped fins, rapid breathing, lethargy, loss of color = ammonia stress
If ammonia reads 0.25-0.5 ppm (expected in new tanks):
- Do 30% water change with temperature-matched, dechlorinated water
- Add Seachem Prime (double dose)—it detoxifies ammonia for 24-48 hours
- Test again in 24 hours
- Continue daily testing and water changes until ammonia drops to 0 ppm
If ammonia reads 1.0+ ppm (danger zone):
- Immediate 50% water change
- Add Prime (double dose)
- Stop feeding for 24 hours (reduces waste production)
- Test in 12 hours—if still high, repeat water change
- Consider adding Tetra SafeStart Plus (bottled beneficial bacteria—sometimes helps)
Day 5-7: Cycle Management and Problem Recognition
Continue daily:
- Feed 3-4 pellets once daily
- Test ammonia + nitrite (nitrite appears as bacteria colonize)
- 20-30% water change if ammonia/nitrite above 0.25 ppm
What “cycling” looks like in real-time:
| Day Range | Typical Reading | What’s Happening | Your Action |
|---|---|---|---|
| Day 1-3 | Ammonia: 0-0.25 ppm | Little waste accumulated yet | Monitor, no action needed |
| Day 4-10 | Ammonia: 0.5-2 ppm | Waste building, bacteria not established | Daily water changes, Prime dosing |
| Day 10-21 | Ammonia drops, Nitrite rises (0.5-2 ppm) | First bacteria colony working, second not ready | Continue water changes for nitrite |
| Day 21-30 | Nitrite drops, Nitrate rises (5-20 ppm) | Both bacteria colonies established | Weekly water changes sufficient |
Green flags (week 1 success):
- Betta eats eagerly every day
- Active swimming, exploring all tank areas
- Builds bubble nest (males only—sign of comfort)
- Vibrant color, fins fully extended
- Ammonia/nitrite managed below 0.5 ppm with daily water changes
Yellow flags (watch closely, take action):
- Occasional missed meals (1-2x/week)
- Rests at bottom frequently but swims when approached
- Ammonia/nitrite 0.5-1.0 ppm despite water changes
- Slight fin clamping (fins not fully extended)
Red flags (emergency—act immediately):
- Refuses food for 3+ consecutive days
- Constant bottom-sitting, won’t swim even when disturbed
- Rapid breathing (gills moving fast, frequent surface gulps)
- Ammonia/nitrite above 1.0 ppm despite daily water changes
- Visible damage: torn fins, white spots, fuzzy patches
🚨 Week 1 Emergency Decision Tree:
Fish won’t eat for 3+ days: Check temperature (below 75°F?), test ammonia (above 0.5 ppm?), inspect for disease (white spots, fungus?). Fix water parameters first, consider antibacterial if parameters are good but fish still ill.
Ammonia won’t drop below 1.0 ppm: Stop feeding for 24 hours, do 50% water changes twice daily, add bottled bacteria (SafeStart Plus), consider moving fish to hospital container if readings stay high.
Fish floating/unable to swim properly: Likely swim bladder issue from overfeeding or cold water. Fast fish for 24 hours, raise temp to 80°F, add aquarium salt (1 tsp per gallon).
Continue to Chapter 4 for detailed water quality management, feeding protocols, common mistakes analysis, and emergency troubleshooting…